Easify V4 is no longer supported and has been superseded by Easify V5.
Customers
Easify provides you with an easy to use, yet powerful means of recording your customer details.
And when it comes to raising quotes & orders you can simply drag a customer from the customers window and drop them onto the open order.

You can access the main Customers window either by clicking the Customers button in the bottom left of the Easify main window, or by selecting Customers->View Customers from the main menu.
The main customers window provides you with a list of all of the customers you have added to Easify, with the most recently added appearing at the top.
Any customers that have had their account put On Stop will show in red in this view:
(Easify won't stop you raising orders for this customer, but if you have enabled Active Credit Control, the Point of Sale can be set up to stop your staff from allowing sales through the POS).

You can customise the columns that you see in the Customers screen by right clicking the list of customers and selecting Choose Columns.
The customer list can be sorted by clicking the heading above the column that you want to sort by i.e. Name, Email, Customer Relation, Customer Type etc...
You can find a particular customer by means of the search box at the top of the customers window. Simply
enter a search term and click the  button.
Customers can also be filtered by the relationship they have with your company i.e. whether they are a prospect, lead or active customer, and also by their type using the Relationship and Type drop down lists.
To view or edit a customers details, double click the customer in the list. Alternately select the customer
in the list and click the  button.
To add a new customer click the  button.
To delete a customer select the customer and click the  button.
You may also access the above features via the main menu. Alternatively you can right click in the customers window to access the features.
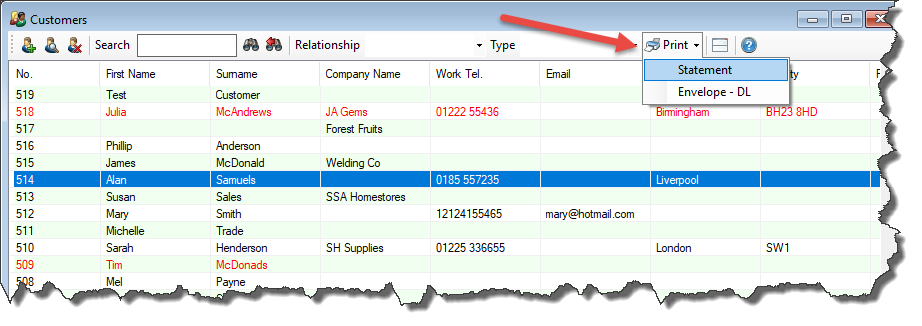
Printing Statements and Envelopes
You can print Statements and Envelopes from the Main Customers window by either right clicking on the customer and selecting Print -> Statement or Envelope, or by selecting the customer and then choosing Print -> Statement or Envelope from the Print drop down menu at the top of the customer window:
Alternatively, if you wish to print all your Statements in one go, you can use the Bulk Statements function.
Customer Details Panel
The lower half of the customers Window consists of the Customer Details Panel. This provides quick real-time access to information about the currently selected customer.
If the customer details panel is not visible you can click the  button
on the toolbar at the top of the Customers Window to show it.
button
on the toolbar at the top of the Customers Window to show it.
Notes
The customer notes panel in the left of the customer details panel displays any notes that you have entered about the customer.
Product Sales History
The Product Sales History tab displays a list of all of the products that the selected customer has purchased for a given time period.
For more information about the Product Sales History feature in Easify click here.Order History
The Order History tab displays a list of the orders that have been raised for the currently selected customer.
Double clicking the order will open it for viewing or editing.
You can right click on an order and select Create Copy of Selected Order to create a copy of it.
Documents
If you have enabled the document management system, you can drag and drop customer documents such as PDF files, images, Word DOC files etc... into the Documents tab. Doing this will instantly store the documents in the Easify document management system allowing them to be quickly and easily accessed by any of your Easify users.
Importing Customers
You can import Customers into Easify from a .csv file.
Click on File->Import->Customers

The Import Customer Wizard will then launch:

Select the .csv file you wish to import and click Next
Easify will then look at the file being imported and ask you to map the columns in the imported file, to the columns within Easify. Use the Scroll bar to see all the columns to be mapped.

Once you have mapped all your columns click Next
The wizard will then check all the data being imported and show a summary of the details being imported. Take note of the Import Status column. This will show you if there any issues with the data you are trying to import.

Invalid data will show in Red with a warning and the Import checkbox will be unticked by default.
It is worth taking some time to check the data shown in this window before importing. If you are unhappy with any records, you can exclude any rows you do not wish to import by unticking the Import tickbox.
Once you are happy with the data, click on Import and the wizard will import your customers into Easify
Once the import is complete you will see the Customers Imported OK window.

We also recommend testing an import on a small amount of records first so you can check to make sure it imports as expected.
