Easify V4 is no longer supported and has been superseded by Easify V5.
Finance - Using A Payment Plan
Part 1: Invoicing on Payment Plan orders
Easify automatically creates a separate invoice for every instalment on a Payment Plan:

Printing an invoice will set the chosen instalment as "Invoiced", and set the instalment's "Date Invoiced" date on the Payment Plan window to the current date. You can edit this information by opening the Payment Plan window and expanding the "Instalment details" section on the Instalment.

If you wish to select an alternative invoiced date you can do so with the calendar picker and when you print the invoice it will display the invoiced date you have selected.
Invoice numbering scheme
Easify adds a hyphen followed by a number to Payment Plan invoices. The number corresponds to the amount of instalments on the Payment Plan.
For example, invoice numbers on an order with 3 instalments would look something like this:
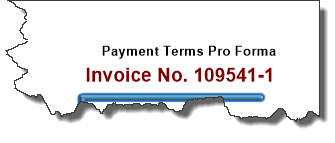
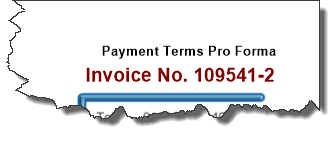

The number before the hyphen is the order number.
The number after the hyphen is the instalment number.
Part 2: Taking payments on Payment Plan orders
You take payments on Payment Plan orders in the same way you would any other order. The main difference happens behind the scenes so it is best demonstrated in an example.

Here is an example of a customer order with a Payment Plan set up on it:

And here are the Payment Plan details:

Initial Payment = £1000.00
Final Payment = £440.00
If a customer makes a payment of £1000, then the Payment Plan details update and the first instalment is marked as Paid. This can be confirmed after you have processed the payment by opening up the Payment Plan window and expanding the "Instalment details" section.

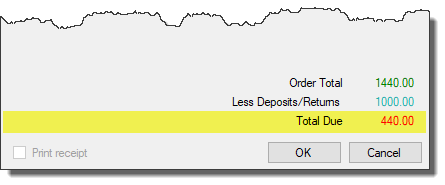
And as expected, on the Take Payment (F12) window, the remaining balance is displayed:
 What if the customer pays more than an instalment amount?
In the example above the 2 instalments are:
Initial Payment = £1000.00
Final Payment = £440.00
If a customer makes a payment of £1200, Easify will record the first £1000 on the Initial Payment and mark it as "Paid". Then it will record the remaining £200 of the customer payment against the Final Payment. However, it won't mark the Final Payment as "Paid" until the outstanding order balance (£240) has been paid for.
Once an order has been paid in full, it will be marked as ‘All paid’ on the Billing tab.
